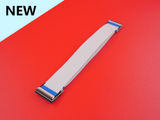
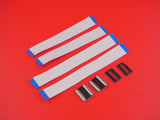
This sensor ribbon cable is a compatible replacement for your Blackmagic Pocket 4K camera. It is constructed with rigid PCBs and off-the-shelf FFC jumper flex cables. The advantage of this design is that rigid PCB is much easier and more reliable to solder fine pitch connectors to, reducing defects which can cause a camera to not boot up.
The FFC cables act as a sacrificial element that is cheap and easily replaceable in case they are torn in a crash. When pulled on, the FFCs are more likely to pull out before damaging the precious Molex connector soldered to the camera boards.
The circuit design results in low impedance and minimizes interference between signals. This allows creative users to install even longer FFC jumper cables for special projects.
Features
- Rigid PCB for higher reliability
- FFC jumper cables act as sacrificial part
- 3D printed backers eliminate connector rocking, maintaining solid signal
Includes
- 2X FFC Converter PCBs
- 2X 120mm 28P 0.5mm pitch FFC cable
- 2X 100mm 28P 0.5mm pitch FFC cable
- 1X 3D printed main board backer
- 1X 3D printed sensor board backer
Installation Instructions
Before starting, you may optionally want to wrap the FFC cables in a protective cloth tape such as Tesa 51036 tape. This protects the FFC cables from wear and tear against the carbon fiber while making camera angle adjustments. It also makes it look a bit more professional.
 You can find this tape at most big online retailers like Ebay or Amazon.

Use two lengths of tape per FFC cable to fold around the edge and have some overlap. This is the end result. Are you excited now!? Let's get started...

First insert a 100mm FFC jumper cable into the connector facing outward by sliding the cable into the connector while the black latch is raised up. Then lock the latch down gently, but firmly.

Then insert a 120mm long FFC cable into the remaining connector. Be sure to press the cable in all the way by using a fingernail or tool to push on the blue stiffener tab.

Install the rectangular 3D printed backer by slipping the TPU part over the Molex mezzanine connector. Be sure to match orientation exactly to the picture above. There are pockets designed into the backer to allow clearance for PCB components on the camera board like resistors and capacitors. If the orientation is wrong, the cable will not be pluggable.

Next slip on the other 3D printed backer onto the other FFC PCB converter. This backer is different and has a small cutout to avoid the sensor shims on the camera. Match the orientation to the picture above. Do not attach this side to the cable yet.

Plug in the main board side by pressing the connector into place. Be sure to not put any bending stress onto the camera PCB by bracing your fingers underneath to support the PCB while you press the connector on. Place the top plate onto the cage and feed the loose ends of the cable through the cutout in the carbon fiber.

Guide the FFC cables around the screw and standoff to avoid pinching. Then fasten the remaining screws to secure the top of the cage.

Insert the loose FFC ends into the other PCB converter board. Ensure that the FFC ends are inserted to their fullest extent and are flush and square with the connectors.

Press the connector into place while supporting the sensor PCB from the back side to prevent any bending stress on the camera components. That's it you are done!


