


UPGRADE YOUR NAKED BMPCC4K
The new and improved LCD extension system for the naked Blackmagic Pocket 4K camera is finally here! This is a keystone product for improving the workflow with naked pocket cinema cameras by providing a reliable connection interface between the camera and LCD to change settings and check exposure, ISO, shutter speed, etc.
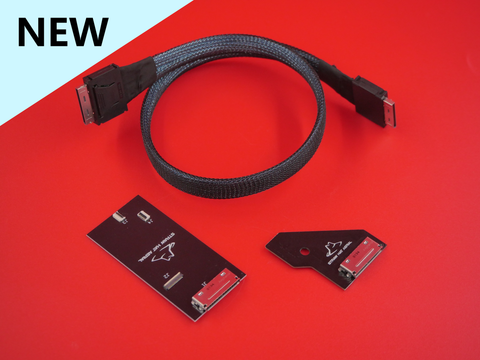
This new design features a rigid PCB construction and a professional wire cable harness as the jumper between the LCD case and camera cage. The rigid PCB adapters are much more reliable to manufacture so this means consistent connectivity in the field when the pressure is on! The wire cable harness is a more rugged alternative to the previous flex FPC design and is easily stored in a case or backpack without worrying as much about bending or breaking signal wires.
The new connector system utilizes an 80 pin interface which improves signal integrity for a clean feed to the LCD with even longer 2 meter+ cables and it allows pass through function of the original buttons circuit for familiar interface with the camera.
Compatibility
This kit is compatible with the Pigeon 3.0 naked cage design. Please refer to the installation instructions below on how to install the system.
If you own a V1 Le Pigeon cage with red 15mm standoffs, this may be too low profile and you may need to source some 20mm standoffs to allow additional clearance for the PCB extension adapter and also source 6X 20mm M2 socket head screws, as well as 6X M2 nylock nuts and some 1/8" x 1/16" silicone tubing to act as a spacer/damping. If you have the Pigeon 3.0 cage, you already have these parts.
Specifications
- Rigid 1mm PCB construction
- 18 inch (457mm) length wire cable harness
- 80-pin connectors with 10,000 mating cycles
- Push button latching plugs for stronger mechanical connection
- Low RF interference and improved signal integrity
Includes
- 1X LCD Jumper Cable
- 1X PCB extension adapter
- 1X Monitor extension adapter
- Additional mounting hardware
Installation Instructions
Follow the guide below to properly install your upgrade LCD extension kit for proper fit and function:

The PCB extension adapter comes with a 3D printed shoulder washer/spacer and stainless steel washer plus hex nut. These are necessary for locking the PCB rigidly to the camera motherboard without putting stress on either PCB, but ensuring that the adapter stays connected and secured to the main camera board.
Follow the video instructions below at time code 1:25:58 to see how to install this motherboard extension properly:


Next up is the monitor extension PCB! Use two small strips of 3M VHB mounting tape and stick them on the back of the PCB. You can use any other strong double sided acrylic foam-based tape that is about 0.5mm thick. Align the monitor extension PCB with the back of the LCD and stick it down and connect all the plugs. NOTE the above image is the new version of the LCD case which uses 1mm carbon fiber side plates to secure the connector plug in place to prevent stress on the LCD when mating the connectors.

If you have the Pigeon 3.0 cage LCD case you will need to 3D print a TPU brace that slides and clicks around the connector and provides support for the plug. You can find the STL for that HERE. Download the "PCB Brace V5" part file.


After 3D printing your PCB brace you must use side cutters to trim off the bridging filament that supports the latching clip so that you can fully insert the brace and latch it into place behind the connector edge to lock it.

After adhering the the monitor extension PCB to the back of the LCD and connecting the ribbon connectors, slide the TPU PCB brace onto the connector until the internal latch engages and clicks into place. You may not hear a click since it is TPU, but you can tell visually when the bump is gone and the surface is flat.